Fitting Protective Equipment
- Remove the battery from the power tool before carrying out work on the power tool (e.g. maintenance, changing tool, etc.). The battery should also be removed for transport and storage. There is risk of injury from unintentionally pressing the on/off switch.
Note: If the grinding disc breaks during operation or the holding fixtures on the protective guard/power tool become damaged, the power tool must be sent to the after-sales service immediately; see the "After-Sales Service and Application Service" section for addresses.
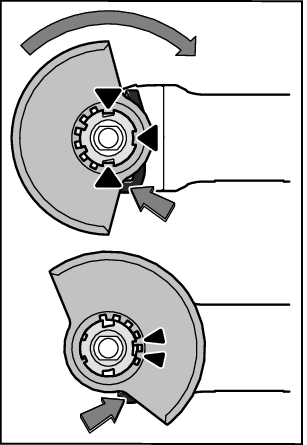
Place the protective guard (10) onto the holder on the power tool until the coding cams of the protective guard are aligned with the holder. When doing so, press and hold the unlocking lever (1).
Press the protective guard (10) onto the spindle collar until the shoulder of the protective guard is sitting on the flange of the power tool and rotate the protective guard until it audibly clicks into place.
Adjust the position of the protective guard (10) to meet the requirements of the operation. To do this, push the unlocking lever (1) upward and rotate the protective guard (10) into the required position.
- Always position the protective guard (10) such that the two cams on the unlocking lever (1) engage in the corresponding openings on the protective guard (10).
- Adjust the protective guard (10) such that sparking in the direction of the operator is prevented.
- The protective guard (10) must only be adjustable while the unlocking lever (1) is actuated. Otherwise, the power tool must not be used any more under any circumstances and must be sent to the after-sales service.
Note: The coding cams on the protective guard (10) ensure that only a protective guard that is suitable for the power tool can be fitted.
- When cutting, always use the protective guard for grinding (10) with a fitted cover for cutting (11).
- Provide sufficient dust extraction when cutting stone.
Cover for cutting
Fit the cover for cutting (11) on the protective guard for grinding (10) (see figure A): Swivel the lever back (➊). Attach the cover (11) to the protective guard for grinding (10) (➋). Press the lever firmly into place again on the protective guard (10) (➌).
To remove the cover (see figure B), swivel the lever back (➊). Remove the cover (11) from the protective guard (10) (➋).
Note: The GWS 18V-180 PC angle grinder is supplied with a low-vibration auxiliary handle (7) that extends the distance between the user and the gearbox housing. Always use the low-vibration auxiliary handle (7) described in this operating manual to ensure operational safety and optimum ergonomics.
The low-vibration auxiliary handle (7) reduces vibration, enabling the tool to be used safely and more comfortably.
Screw the auxiliary handle (7) on the right or left of the machine head depending on the working method.
- Do not operate your power tool without the auxiliary handle (7).
- Do not continue to use the power tool if the auxiliary handle (7) is damaged. Do not make any alterations to the auxiliary handle (7).
