Fitting Protective Equipment
- Pull the plug out of the socket before carrying out any work on the power tool.
Note: If the grinding disc breaks during operation or the holding fixtures on the protective guard/power tool become damaged, the power tool must be sent to the after-sales service immediately; see the "After-Sales Service and Application Service" section for addresses.
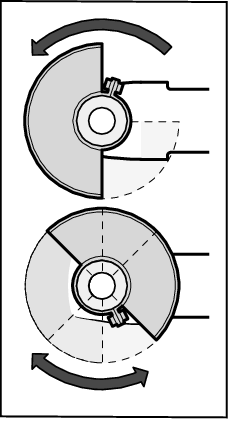
Place the protective guard (8) on the spindle collar. Adjust the position of the protective guard (8) to meet the requirements of the operation. Lock the protective guard (8) by tightening the locking screw (9) using the combination wrench (3)/(4).
- Adjust the protective guard (8) such that sparking in the direction of the operator is prevented.
Note: The coding cams on the protective guard (8) ensure that only a protective guard that is suitable for the power tool can be fitted.
For low-dust grinding of paints, lacquers and plastics in conjunction with carbide grinding heads (13), you can use the extraction guard (7). The extraction guard (7) is not suitable for machining metal.
A suitable Bosch dust extractor can be connected to the extraction guard (7). To do so, insert the vacuum hose with dust extraction adapter into the provided receiving connection of the extraction guard.
- For cutting, always use the protective guard for cutting (10) or the protective guard for grinding (8) together with the cover for cutting (11).
- Provide sufficient dust extraction when cutting stone.
The protective guard for cutting (10) is fitted in the same way as the protective guard for grinding (8).
Plastic cover for cutting
Attach the plastic cover for cutting (11) to the protective guard for grinding (8) (see figure A). The cover (11) audibly and visually engages on the protective guard (8).
To remove the cover (see figure B), unlock the cover (11) on the left- or right-hand side of the protective guard (8) (➊) and remove the cover (➋).
Screw the auxiliary handle (6)/(5) on the right or left of the machine head depending on the working method.
- Do not operate your power tool without the auxiliary handle (6)/(5).
- Do not continue to use the power tool if the auxiliary handle (6)/(5) is damaged. Do not make any alterations to the auxiliary handle (6)/(5).

The low-vibration auxiliary handle (5) reduces vibration, enabling the tool to be used safely and more comfortably.